
Bass Fish drawing involves capturing the essence of this popular freshwater fish through the art of illustration. It is the process of creating a visual representation of a bass fish on paper or any drawing surface using various artistic techniques.
How To Draw Bass Fish in Six Steps? Have you ever wondered how artists bring the majestic bass fish to life on a blank canvas Whether you’re a budding artist or someone looking to try your hand at drawing, the prospect of creating a detailed bass fish illustration in just six simple steps might pique your curiosity.
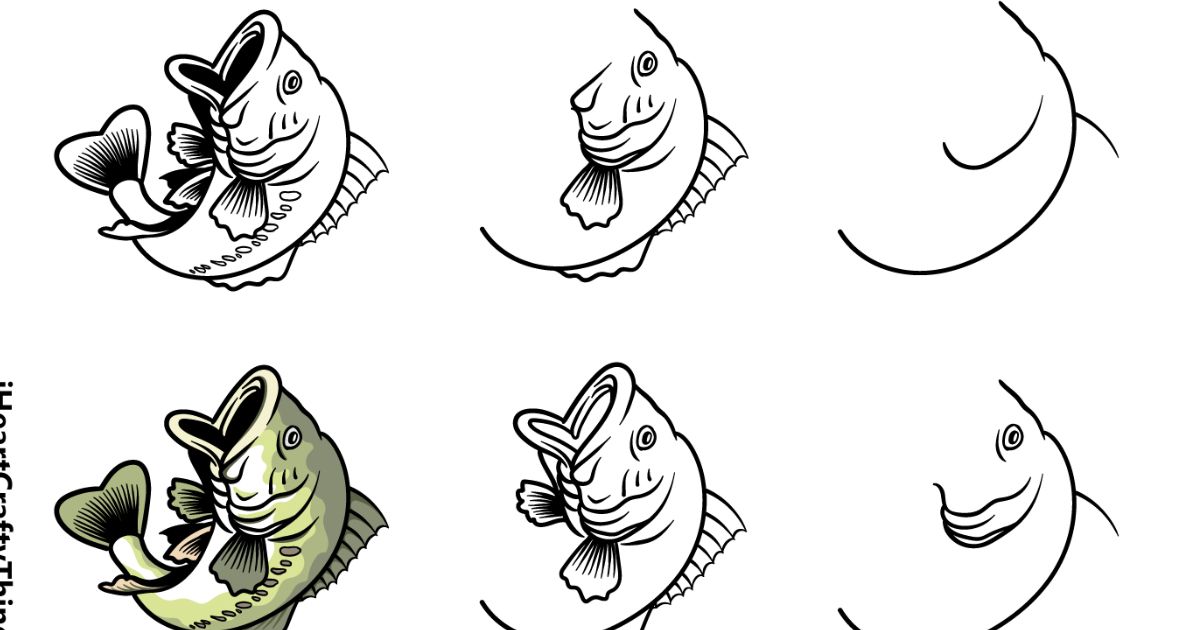
Draw Bass Fish Steps Begin your artistic adventure with the first step of drawing a bass fish by outlining its basic form. Progress through each step, refining the details and adding dimension to your illustration. From sketching the body contours to accentuating the distinctive markings and fins, these steps guide you in capturing the unique characteristics of a bass fish.
Step 1: How to Draw A Bass Let’s Get Started
Embark on your bass fish drawing adventure with the foundational step of sketching the basic form. Begin by gathering your essential tools – a reliable pencil, a clean sheet of paper, and a good eraser. Position your hand comfortably, ensuring ease of movement as you outline the fundamental contours of the bass fish. Don’t worry about perfection at this stage; focus on capturing the overall shape and size. This initial sketch sets the stage for the detailed drawing to come. With Step 1, you’re taking the first exciting strides toward creating a lifelike representation of this iconic freshwater species.
As you start sketching, keep in mind the unique features of a bass fish, such as its streamlined body and distinctive fins. This preliminary step lays the groundwork for the subsequent stages where you’ll delve into finer details. Enjoy the process, and let your creativity flow as you bring the essence of a bass fish to your canvas. With Let’s Get Started, this initial step becomes an inviting and accessible entry point into the world of bass fish drawing, setting the tone for an enjoyable and rewarding artistic journey.
Step: 2 Drawing the Eye and Other Gills
In the second step of our guide on how to draw a bass fish in six easy steps, we delve into the essential task of sketching the eye and other gills. This step is crucial in infusing life into your bass fish illustration. Begin by carefully outlining the fish’s eye, paying attention to its shape and placement on the body. Add a glint to the eye to create a realistic and engaging focal point. Moving on to the gills, skillfully draw the delicate lines and curves that define these respiratory structures. The attention to detail in capturing the intricacies of the eye and gills brings authenticity to your bass fish drawing, laying the foundation for a truly lifelike depiction.
To enhance your success in drawing the eye and gills, consider using a fine-tipped pencil for precise detailing. Take note of the eye’s reflective quality, ensuring that it appears vibrant and full of life. For the gills, employ light, curved strokes to convey the subtle layers of these fish features. Remember that the eye and gills contribute significantly to the overall expression of the bass fish, so take your time to master this step. By the end of Step 2, your bass fish illustration will already exhibit a newfound depth and realism, setting the stage for the subsequent steps in this artistic journey.
Step:3 Now, Draw Some Fins for the Bass
In the third step of drawing a bass fish, focus on enhancing the authenticity of your illustration by adding fins. Begin by carefully sketching the dorsal fin, which runs along the fish’s back. Pay attention to its size and shape, as these details contribute significantly to the overall appearance. Move on to the pectoral fins on each side, ensuring they are symmetrical and well-proportioned. These fins play a crucial role in balancing your bass fish drawing. Don’t forget the pelvic and anal fins, located on the lower part of the fish. These additions provide a dynamic touch to your illustration, creating a more lifelike representation of a bass in its natural habitat.
Remember to maintain a steady hand as you draw the fins, and use light strokes initially to establish the shape. Gradually refine the details, adjusting the length and curvature as needed. By the end of this step, your bass fish drawing will begin to take on a more recognizable form, with fins that contribute to the overall grace and movement of this aquatic creature.
Step 4: Drawing the Mouth and Another Fin
In this pivotal step, attention turns to the intricate details of the bass fish’s facial features. Begin by carefully sketching the distinctive mouth shape, paying close attention to its placement in relation to the eye and overall facial structure. Capturing the unique characteristics of the bass fish’s mouth adds a layer of authenticity to your illustration. Following this, move on to drawing another fin, balancing the fish’s symmetry and enhancing its overall visual appeal. This additional fin contributes to the dynamic movement of the bass fish, making it a crucial element in creating a lifelike representation. Take your time to ensure accuracy in the placement and proportion of these features, as they significantly influence the realism of your drawing.
As you progress through Step 4, consider experimenting with subtle variations in line thickness to convey depth and texture. This simple yet effective technique adds dimension to the mouth and fin, elevating your bass fish drawing to a more detailed and polished level. Remember, mastering the nuances of these features brings your illustration one step closer to capturing the essence of this iconic freshwater species.
Step 5: Drawing the Tail and Final Details
In this crucial fifth step, bring your bass fish to life by sketching its distinctive tail and adding those final details that make your illustration truly stand out. Begin by carefully crafting the shape and size of the tail, paying attention to the specific characteristics of the bass fish species you’re portraying. Whether it’s a largemouth or smallmouth bass, capturing the unique features of the tail is key to achieving a lifelike representation. Once the tail is defined, move on to the final details that will elevate your drawing to a new level of realism. This includes refining scales, perfecting facial features, and adding any additional markings that give your bass fish its individual identity. Take your time in this step, as it sets the stage for the completion of your artistic masterpiece.
As you draw the tail and finalize the details, consider the overall composition of your bass fish. Ensure that the proportions are balanced and that the tail complements the body, creating a harmonious visual flow. This step is not only about precision in drawing but also about infusing character into your illustration. Don’t hesitate to add subtle nuances that make your bass fish unique, whether it’s a playful flick of the tail or a distinct pattern of scales. With the tail and final details in place, your bass fish drawing is on the brink of completion, ready to showcase the beauty of this freshwater species in all its glory.
Step 6: Finish off Your Bass Drawing with Some Color

Completing your bass fish drawing is an exciting culmination of your artistic efforts. In the final step, consider adding a splash of color to elevate your illustration. Whether using colored pencils, watercolors, or digital tools, introducing color brings vibrancy and realism to your artwork. Experiment with various shades to capture the distinct hues of a bass fish’s scales, fins, and overall appearance. This step not only enhances the visual appeal but also provides an opportunity to showcase your creativity and personal style in portraying this freshwater favorite.
To get started, select a color palette that mimics the natural tones of a bass fish. Begin by layering base colors and gradually add shading to create depth and dimension. Pay attention to the interplay of light and shadow, especially around the gills and fins. Don’t hesitate to blend colors to achieve a seamless and lifelike effect. Whether you opt for a realistic color scheme or take a more artistic approach, the final touch of color adds a captivating finishing element to your bass fish drawing, making it a true masterpiece that stands out.
Frequently Asked Questions
What materials do I need for drawing a bass fish?
Gather essential tools like pencils, erasers, and quality paper to start your bass fish drawing journey.
Can I draw a bass fish even if I’m a beginner?
Absolutely The step-by-step guide is designed for all skill levels, providing a user-friendly approach for beginners.
Is it necessary to add color to the bass fish drawing?
While optional, adding color enhances realism, allowing you to experiment with different mediums like colored pencils or watercolors.
How long does it take to complete a bass fish drawing using six steps?
The time varies, but with practice, you can create a detailed bass fish illustration in a reasonable timeframe.
Can I showcase my bass fish drawing online or in a portfolio?
Certainly Learn effective presentation techniques to exhibit your artistic achievement, whether digitally or in a physical portfolio.
Conclusion
In wrapping up your bass fish drawing adventure, take pride in the artistic journey you’ve undertaken. You’ve mastered the basics, from sketching the initial form to adding intricate details and finishing touches. Through six simple steps, you’ve transformed a blank canvas into a captivating representation of this freshwater favorite. Whether you’re a beginner or a seasoned artist, the accomplishment lies not just in the completed drawing but in the skills and confidence gained along the way. Your bass fish illustration is a testament to your creativity, perseverance, and the joy found in the art of drawing.
As you step back and admire your finished masterpiece, remember that the process is as valuable as the outcome. Each stroke of the pencil, every added detail, and the final touch of color contribute to a unique expression of your creativity. Whether you choose to share your artwork or keep it as a personal achievement, relish in the satisfaction of bringing a bass fish to life on paper. The journey doesn’t end here; it’s a springboard for future artistic endeavors, encouraging you to explore and express yourself through the fascinating world of drawing.